
Want to connect you services in AWS and OCI? Both clouds offer LAN-to-LAN VPN services, but they are normally used to connect from the Cloud to On-Premise. In this article I will explain how you can connect the OCI and AWS VPN services directly with each other.
Step 1 – Setting up non overlapping Private Networks
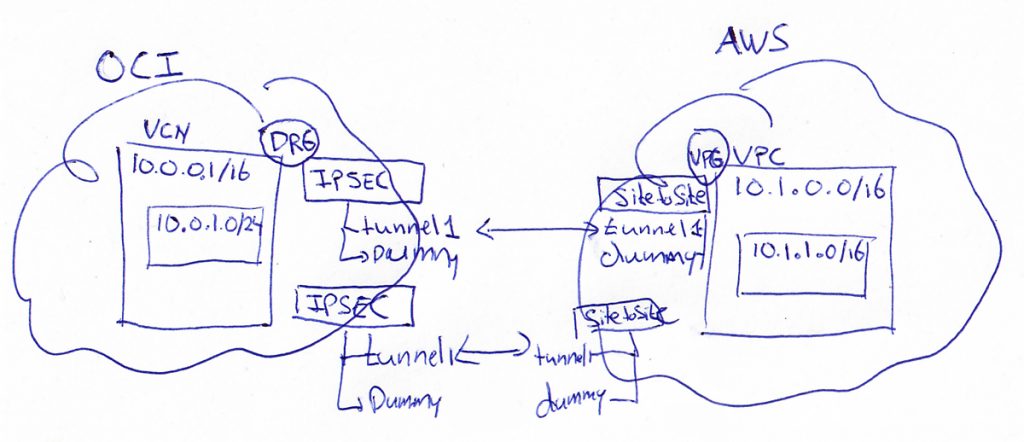
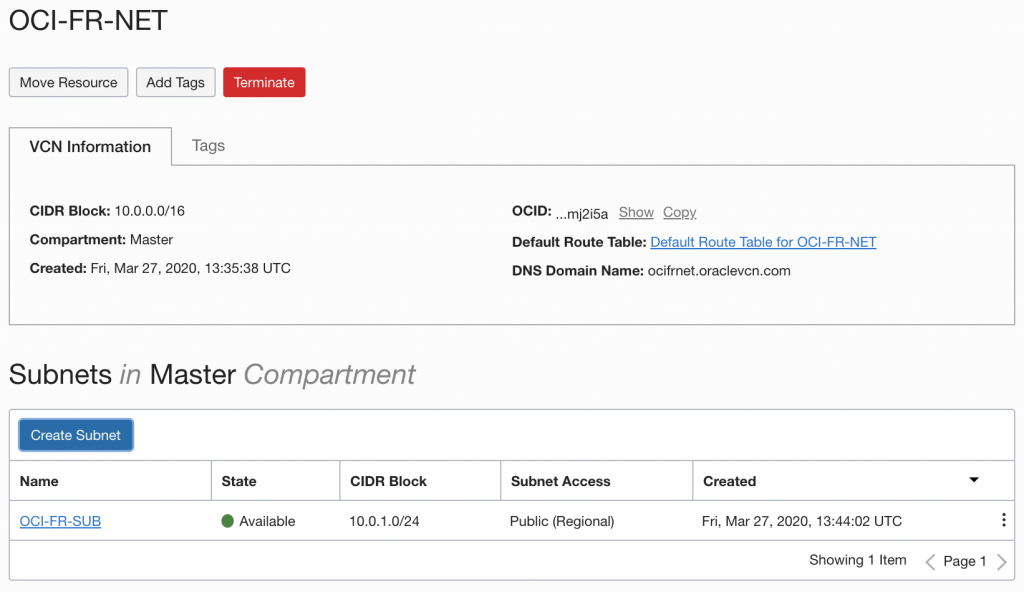
So to start off, let’s make sure you have a VPC on AWS and a VCN on OCI with non overlapping CIDR ranges. I am using for OCI 10.0.0.0/16 and for AWS 10.1.0.0/16. This is up to you, as long as the ranges do NOT overlap!


Step 2 – Creating the IPSEC tunnel on AWS
You need to first setup the IPSEC (Site-to-Site VPN Connection) on AWS. As only AWS allows you later to change the Customer Gateway/Customer-Premises Equipment.
You first need to create a “dummy” Customer Gateway, as you do not know the IP address of the OCI IPSEC gateway yet.

You can specify pretty much anything you want, as you will later create a new Customer Gateway with the correct information.
Next, you need to create a Virtual Private Gateway, this will be the routing service on the AWS side (like the DRG on OCI).

After the Virtual Private Gateway is created, attach it to your VPC.

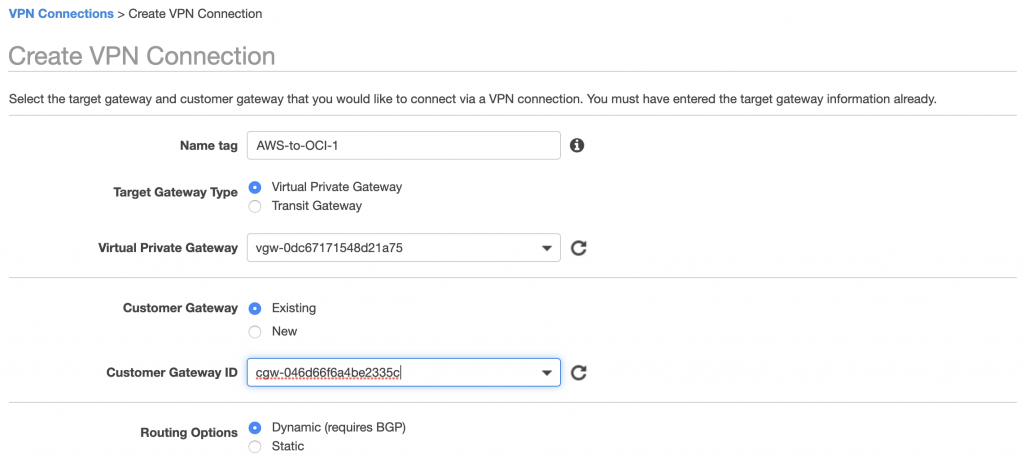
Now you can create on AWS side the IPSEC tunnel (Site-to-Site VPN Connection). Let’s call this AWS-to-OCI-1, #1 because if you want a redundant connection you later need to connect a 2nd one. Make sure you have the Routing Options set to Dynamic (requires BGP)
All the other settings (tunnel settings) can stay as-default empty.
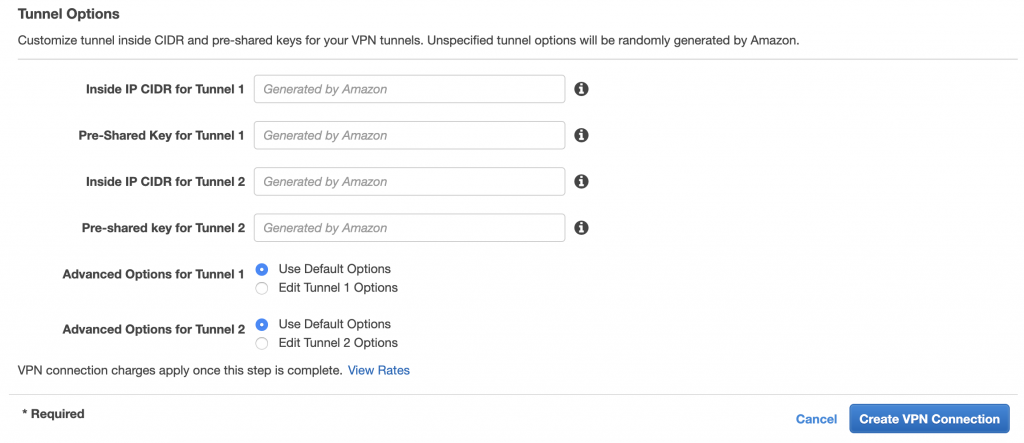
While the VPN is being setup (takes a few minutes), you can download the configuration. You will need the information from that document to setup the IPSEC tunnels on OCI

Download the configuration, select “Generic”for the Vendor/Platform.

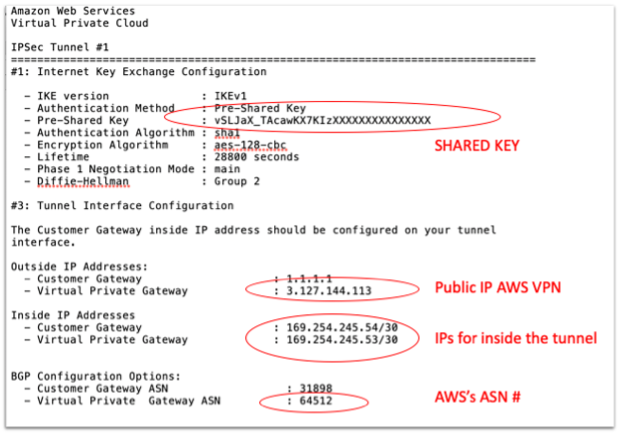
IMPORTANT: Check that the Pre-Shared key ONLY contains Letters and Numbers. OCI does not support . and _ !! (while AWS does, but AWS does not support spaces). You can also specify your own Pre-shared keys, so you can make sure you only have Letters and Numers.
Example: The Pre-shared key in the above image is NOT correct, as it contains an underscore and this will not be accepted in OCI.

Step 3 – Creating the IPSEC tunnel on OCI
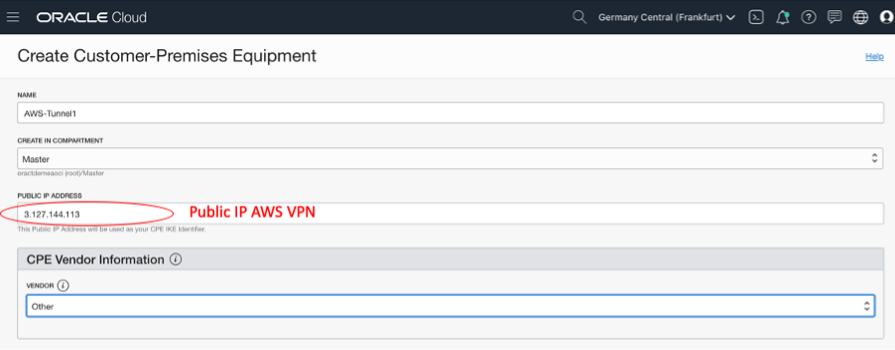
The first thing in OCI you need to create is a “Customer-Premises Equipment”, in this case not really a “customer-premises” but you will do this for the AWS-Premise 🙂 You will find the “Customer-Premises Equipment” option in the Network menu.

Click on the Create button and specify the AWS IPSEC Public IP address that you can find in the downloaded configuration file (See Image above)
If your VCN does not have a DRG (Dynamic Routing Gateway) yet, make sure you create one. You will find the DRG option again in the networking menu.

After you have created the DRG make sure you attach it to your VCN.

Click on the “Attach Dynamic Routing Gateway” and select the DRG you have created.

Now you can create a new IP SEC connection. You will find the IP SEC Connections also in the network menu.

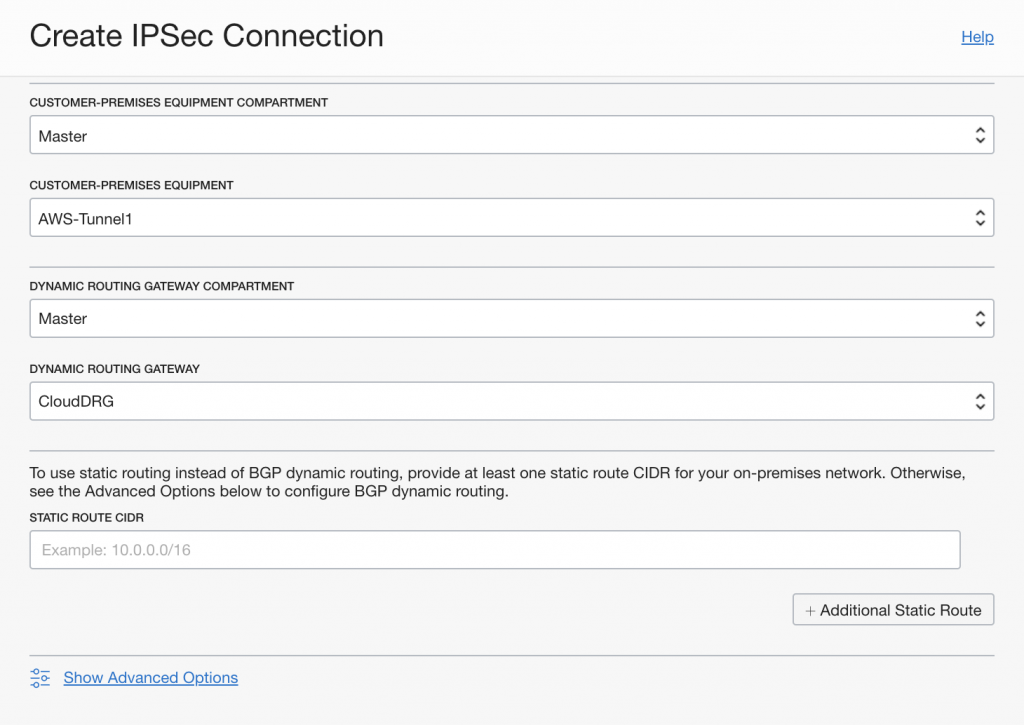
IMPORTANT: Before you click on “Create IPSec Connection”, click on the “Show Advanced Options”!!!
You need to configure the Tunnel 1 and Tunnel 2 Settings, see the below image.
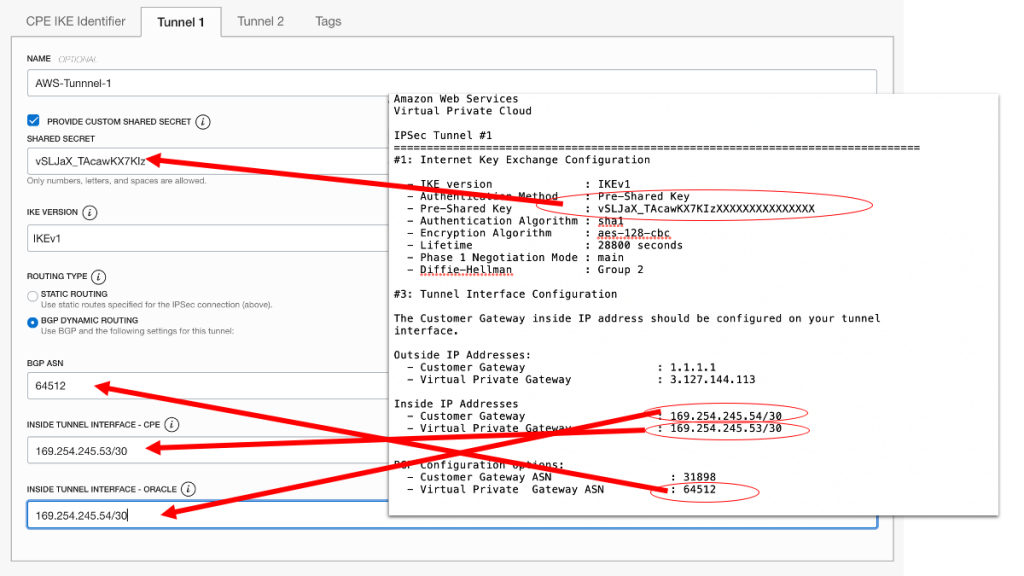
For tunnel 2, you just need to provide “dummy” information. Do make sure you set routing type to BGP.

You can create the IPSec Connection, this will take a few minutes.
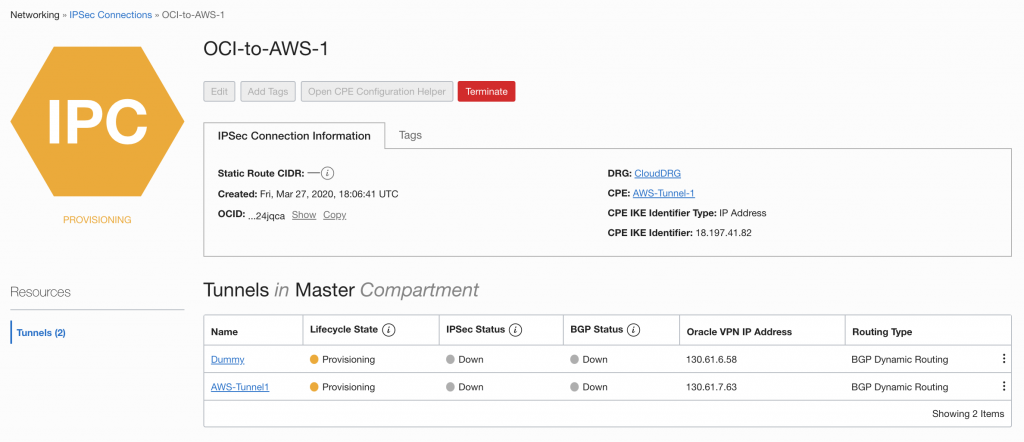
You will now see the Public IP address for the “AWS-Tunnel1” on the OCI side. In my case 130.61.7.63. With this you now need to go back to AWS and create a new Customer Customer Gateway.
Step 3 – Create Correct New Customer Gateway on AWS
In AWS go to the Customer Gateways and click on “Create Customer Gateway””
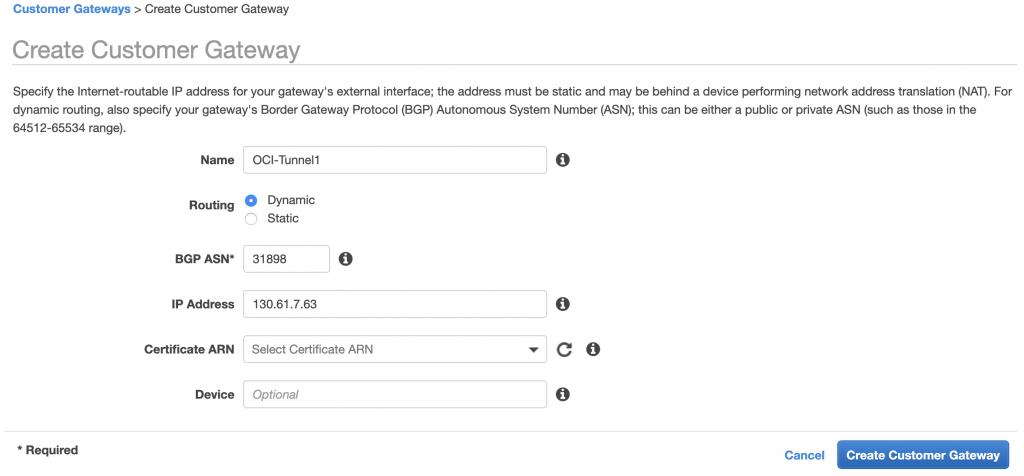
For this gateway, use the IP Address of the Oracle VPN (not the dummy tunnel) and set the BGP ASN to Oracle = 31898.
After this is created, go to the Site-to-Site VPN Connection and click on “Actions – > Modify VPN Connection”

Change the target type for the Customer Gateway, and select here the newly (correct) configured Custer Gateway (that is using the actual OCI VPN IP).
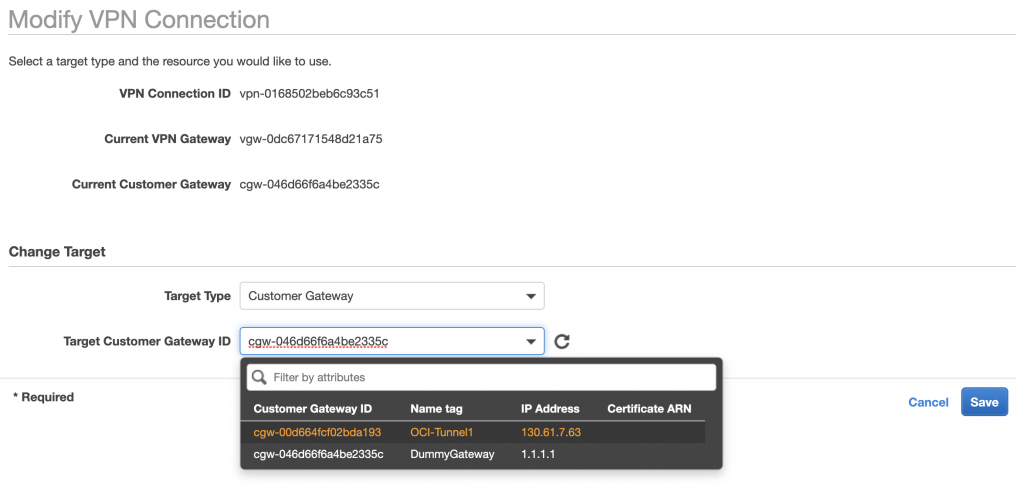
AWS will update (modify) the VPN connection, this again takes a few minutes.

You are almost there! After AWS is done modifying the VPN Connection you should see on both sides that the tunnel is up.

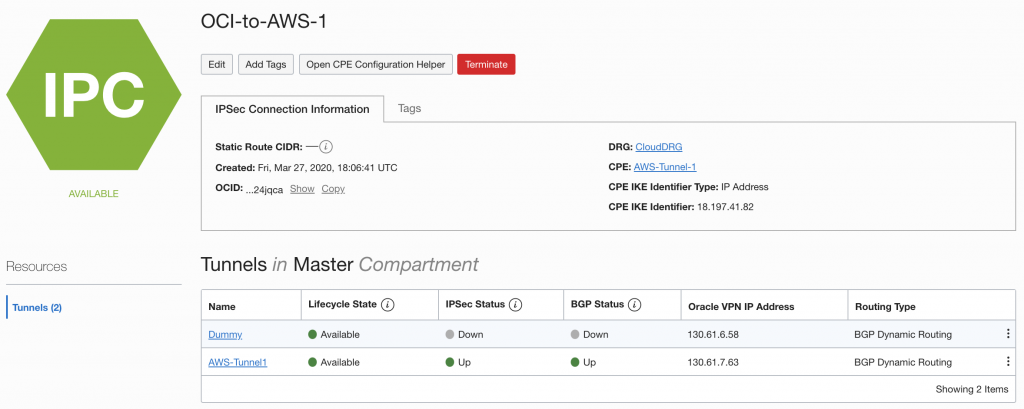
Step 4 – Configure the Route Tables
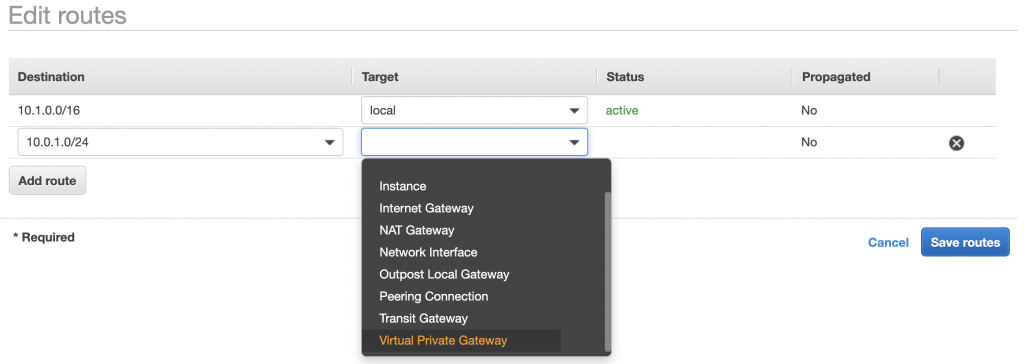
The tunnel is UP, now you need to make sure that the route tables enable the actual flow of data. In AWS go to your Route Tables and click on Edit Routes.

Add a route for 10.0.1.0/24 (This is the CIDR range of the Subnet in OCI).
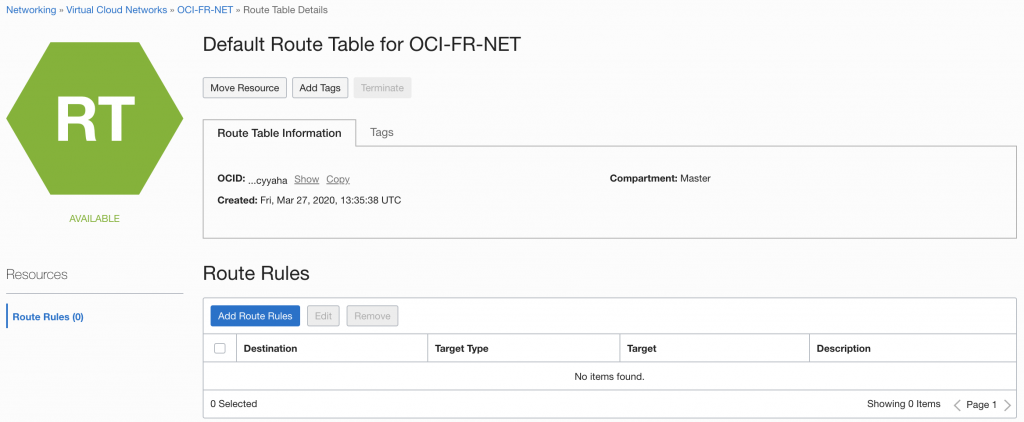
You need to do the same for the route to AWS in OCI. In OCI go to your VCN and click on Route-Tables. Click on the default-route-table and click on Add Route Rules
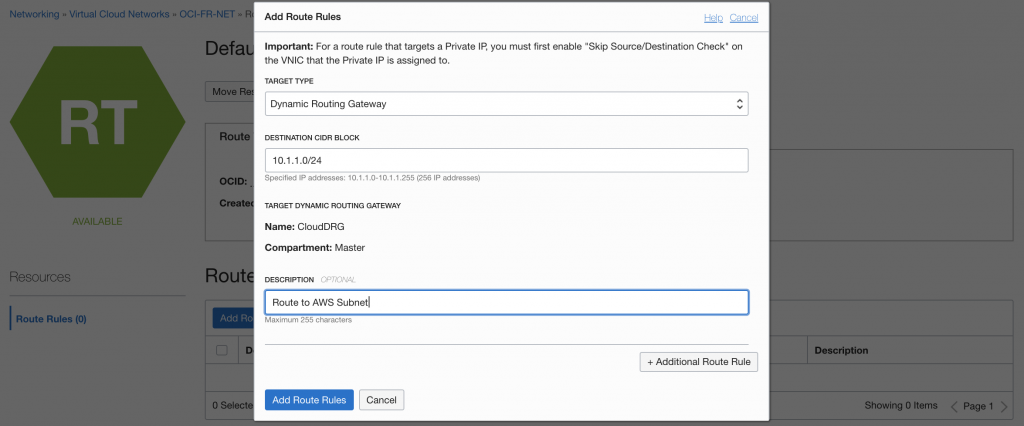
Add the route to the AWS Subnet, in my case 10.1.1.0/24
Step 5 – Configure your Network Security
Your VPN tunnel between OCI and AWS is now up and you have the correct routing, but both clouds by default do no allow any traffic to flow.
In OCI make sure you configure the Security List or Network Security Group to allow the traffic you want to allow to flow between OCI and AWS.
In AWS configure the Network ACLs and Security Groups to allow the traffic you want to allow to flow between OCI and AWS.
In my case I have allowed ICMP and SSH, so I can SSH and Ping between my instances. Lo and behold, I can ping between my instances using the Private IP Addresses. Both or neither need an Internet Gateway to connect to each other 🙂

Step 6 – Making the VPN Redundant
As both VPN services can only be configured with one On-premise IP address, you need to duplicate all the steps again to create a 2nd VPN connection, again with one active tunnel and one dummy tunnel.
In case one of the Tunnels goes down the BGP routing will automatically route thru the other tunnel (this can take a minute to fail over).
CREDITS: I want to thank Tom Walker, my Oracle Colleague fro Australia who did all the hard work of figuring out the setup with BGP routing. Thanks Tom!!!
Do they have any plans to have a dedicated backbone network to communicate like Azure-OCI ? goal is to have back end services like DB on OCI while apps run on AWS.
Richard, Tom, I duplicated your configuration, and it works! Thank you very much for sharing!
Cheers from RWS
Most welcome Sergio, glad it helped!
Cheers,
Tom
Hi Tom,
I duplicated your configuration for AWS-to-OCI connectivity.
After all configuration, still both end tunnels are DOWN.
Anything need to configure to replicate the tunnel as UP.
Hey Hanshit,
It could be any number of things… it’s probably not BGP as the tunnel would be UP but your BGP status would be down. Ensure the PSKs and IKE versions match would be my first port of call.
What is the max latency via VPC between OCI AWS? What is the VPC connection bandwidth? Can it be used for OLTP connections? DB@OCI and APPS@AWS
That would really depend on the APP, my best advise would be to just test it.
Hey Rob, with FastConnect on OCI Ashburn, and Direct Connect on AWS US-East-1, the latency is sub 2 ms!
Saved my ass
Thank you brother
Hi Richard,
When we try setup connection between OCI and AWS, on OCI Tunnel1 configuration, in OCI we get error “Invalid IP address : Please dont use link local address” for 169.154.64.249/30 CPE (AWS) and 169.154.64.250/30 Oracle address space. Tunnel2 is 1.1.1.1/30 CPE (AWS) and 1.1.1.2/30 OCI.
OCI does not like 169 space. What is the workaround?
I meant to say 169.254.64.249/30 CPE (AWS) and 169.254.64.250/30
Hey,
Firstly, thank you for taking your time to do this write up. Following it I’m at the part where I’m setting up the IPSec on OCI (https://oc-blog.com/wp-content/uploads/2020/03/Tunnel1.png).
Problem is, I’m getting this message when saving:
“Invalid IP Address. This link local address range is not supported by Oracle.”
It’s in reference to the “IPV4 Inside Tunnel Interface – CPE” and “IPV4 Inside Tunnel Interface – Oracle” fields (as the static router works without using advanced options).
These IPs are direct from the aws downloaded txt file you indicate. Any ideas?
Thank you
The following link local IP ranges are not valid for use with Site-to-Site VPN inside tunnel interfaces:
169.254.10.0-169.254.19.255
169.254.100.0-169.254.109.255
169.254.192.0-169.254.201.255
Why aren’t these addresses valid? I use these ranges in AWS and Azure just fine. The ITEF reserves 169.254.0.0/24 and 169.254.255.0/24 , I’m not aware of the reservations you have outlined. Can you provide documentation by any chance?
Thanks,
Hi same problem for mi, Invalid IP Address. This link local address range is not supported by Oracle.
hi
with fast connect, megaport and vpn tunneling still the problem is same. you can not access the services only you would able to access the resources privately. this is not proper multi-cloud it is just inter-cloud connectivity.
thx
sayantan
Hi, Thank you for your help.
I have a question.
Why is a tunnel used as dummy?
Is it possible to make both tunnels available?
Hi, Thank you for your help.
I have a question.
Why is a tunnel used as dummy?
Is it possible to make both tunnels available?
I really enjoyed your blog and helped me do this in real life. I would now want to migrate my VPG to a transit gateway. I am assuming this will allow me to add another VPC and access oracle using the same tunnel. Is this actually possible? I am assuming, nothing should be changed for OCI side and should work.
Steps: Create Transit Gateway (TrG)> Attach old VPC to TrG > Attach Additional VPC to TrG > Attach TrG to actual Customer Gateway.
I would appreciate your opinion on this.
This worked and connectivity works with existing VPC. Did need to maintain route in VPC to the Transit Gateway. For some reason the new VPC is not able to ping the private IP of OCI.
Any suggestions?
Thank you!